As discussed most recently in Stroming la Route du Nord, by the summer of 2009 my 2005 Suzuki V-Strom DL 650 had taken me across most of northern Canada and the United States, from Alaska and the Yukon to Newfoundland, Labrador and northern Quebec, clocking in total more than 20,000 miles. Selling or trading the bike just didn't seem right: too many memories. So I decided to try something new: add a sidecar; turn the bike into a hack.
Dauntless Motors of Enumclaw, Washington, had experience fitting its M72D sidecar to a V-Strom 650, and as a result was able to offer me what amounted to a sidecar kit: color-matched sidecar, all required mounts for the V-Strom 650, and various options and accessories, including leading leg steering modification, electric trim, and front-matching sidecar wheel with disc brake.
Ordered in March 2009, the kit arrived in June, and the finished hack was ready to roll by fall. Writing up the project has taken considerably longer, not least because it was followed in the summer of 2010 by another project: creating a light weight dual sport adventure bike from a 2009 Husqvarna SM 610 supermoto.
But returning to the V-Strom 650, the bike remained essentially unchanged until the recent arrival of the 2012 model. Since in my experience the pre-2012 models make pretty good hacks and presuming Dauntless still offers the sidecar kits, perhaps other aging bikers will be interested in a brief illustrated summary of my sidecar project. After all, its driving force was not only sentimental attachment to a reliable machine, but also to have the means to continue motorcycling when two wheels might not be enough. Think of a hack as a walker for bikers.
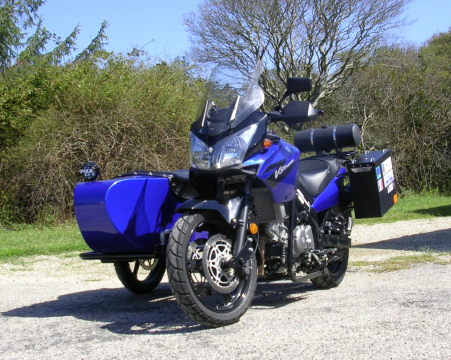
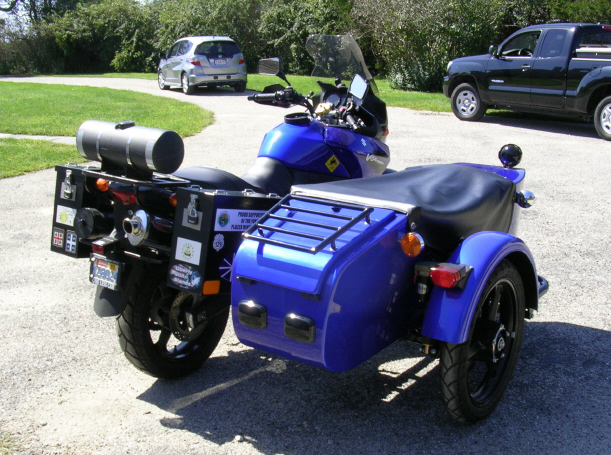
Here are pictures from three different angles of the finished hack:
Several comments are in order.
Although the hack uses more fuel than the bike alone, the auxiliary fuel tank is a leftover from the Dempster and the Route du Nord, each of which presented at least one instance where the distance between fuel stops pushed up against even the solo bike's generous range. Extra fuel for the sidecar is best carried outboard on the sidecar, where its weight will contribute maximally to the rig's stability.
The headlight on the sidecar is required in Massachusetts to obtain an inspection sticker, the only additional requirement to what is required for all motorcycles. It is a PIAA light mounted on a hollow threaded tube so as to allow the wires to run down through the tube, avoiding any additional holes in the sidecar itself.
The brake for the sidecar operates with, and is actuated by the pedal for, the bike's rear brake. New braided stainless steel brake lines were installed front, rear and to the sidecar, and particularly for the rear brake and sidecar noticeably improved braking power and control.
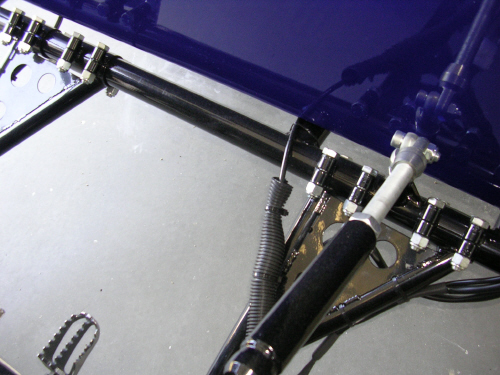
The next picture is a close-up shot of the mounting struts between the bike and the sidecar. It also shows the right side of the mounting frame attached to the bike. The left side of the frame can be seen in the middle picture above. It was the only piece that did not fit as received. Because of their length, the side frames are susceptible to warping from the heat used in powder coating. To make the left one fit, I had to bend it slightly by jamming one end against against a cross-piece between the studs in my garage and applying pressure to other end with a hydraulic jack. The frames are joined at the bottom by attachment to the mounting points for the center stand, a cross bar in front, and a rectangular aluminum plate that ties all these pieces together and also serves as a skid plate.
From a cosmetic viewpoint, probably the most demanding task was attaching the mounting point for the upper end of the rear strut, which required cutting a hole in the plastic trim panel below the seat.
However, by far the most tedious task was adjusting the toe-in and camber. As shown in the picture below, the lower struts attach to the sidecar frame by means of clamps containing a total of 16 bolts, all of which must be loosened and then re-tightened for each adjustment.
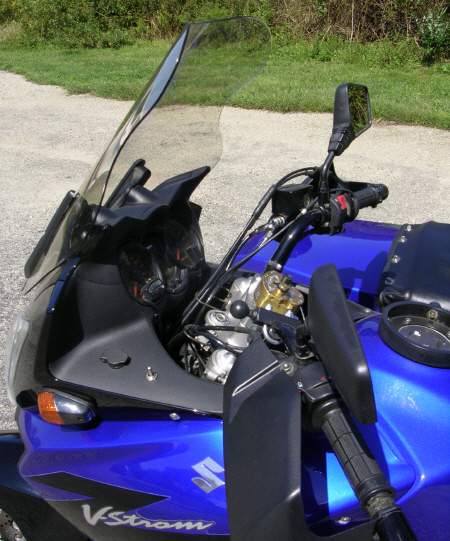
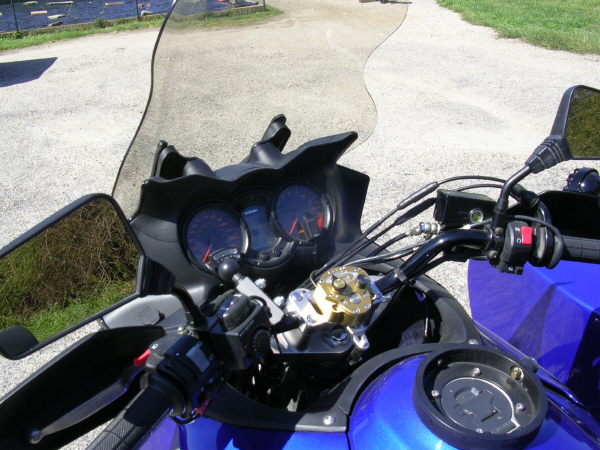
The following two pictures show the dash and handlebar controls. The toggle switch in the foreground of the upper picture is for the electric trim, a useful option to adjust for road camber and/or weight in the sidecar. In the foreground of the lower picture is the switch for the electric grips, and mounted on top of it is the switch for the sidecar's headlight. Both pictures show the battery gauge mounted on the speedometer and the gear selection indicator mounted on the tachometer. To better handle all the additional electronics, I installed a second fusebox under the seat.
Both pictures also show the Scotts steering damper, which has proved very effective at almost completely eliminating start-up headshake. Indeed, had it been installed before my trip to Labrador, I believe it probably would have prevented, or at least greatly reduced, the tankslapper that I experienced early on the TransLab. See Wee-Strom in Labrador. Also contributing to improved steering is a KB fork brace, which can be seen in the last picture showing the leading leg.
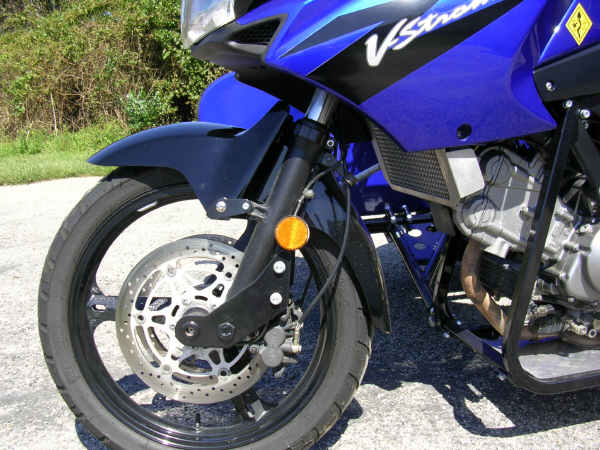
Perhaps the most unique and in many ways most important option offered by Dauntless Motors for the V-Strom is the "leading leg" steering modification pictured below. Hacks do not steer like motorcycles because they cannot lean like motorcycles. Depending on the rider, the rig and the situation, counter steering plays either no or a greatly reduced role. Rather, the hack steers more like a four-wheeled vehicle, going where the front wheel is pointed, but typically with more lean, especially in right hand turns (assuming sidecar mounted on right).
In short, the steering geometry of a hack and a motorcycle differ. Thus a hack's steering can ordinarily be greatly improved by moving the bike's front wheel forward of its original position, i.e., in technical terms by reducing its trail, which is the distance of the front wheel's contact patch behind the steering axis (projected to ground level). On the V-Strom, the leading leg moves the front wheel about three inches forward. Jay at Dauntless promised: "Adding the leading leg is like putting power steering in a car." And he did not exaggerate, as I demonstrated for myself by driving my new rig for a couple of weeks before installing the leading leg as the last step in the project.
Because the leading leg utilizes the mounting points for the front brake calipers, which then mount further down off the leading leg, longer brake lines were required, making it an opportune time to replace the originals with braided stainless steel. Also, the front fender had to be moved forward. While Dauntless provided links for the purpose, the directions for exactly how to install those to the inside and behind the fork tubes were less than clear. My approach, which cannot really be seen in the picture, was to use the backside of the mounting points for the side reflectors.
To conclude, a few words about performance. At reasonably comfortable highway speeds of 65 to 70 mph, the rig tracks quite well without any noticeable tendency to deviate from straight ahead. Gas consumption is of course higher, on average by probably around 20%, but I have not yet compiled sufficient data to make any more definite conclusion. Both the leading leg and the sidecar brake have more than proved their worth, and I would not want to be without either. Being relatively heavy, the sidecar does not fly as easily as many. Still, caution on right turns is warranted, including right transfer of the rider's weight.